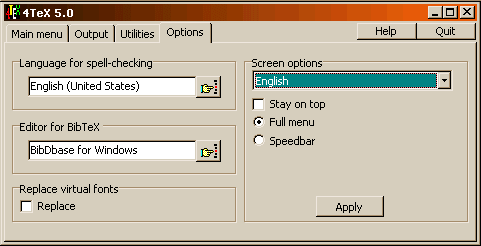
Options menu

On this page you can set several options of 4TeX. The page is divided
into four parts:
- Language for spell-checker
Here the language used for spell-checking the
Main or Current TeX file is selected. Just select the
language from the list.
- Editor for BibTeX
Select the editor used for editing BibTeX files (see
also the BibTeX menu). Just
select the editor from
the list.
- Replace virtual fonts
When checking the "Replace" option, after each
compilation the program DVICOPY will be used to replace
all virtual fonts in a DVI file with real fonts. This
options is e.g. useful when using DVIWIN 2.9 as a
previewer. It can also be useful if you want to use the
DVI file with programs that do not support VF fonts.
Also when sending/mailing the DVI file to others is can
be useful to devirtualize the DVI file.
- Screen options
Before explaining the screen options:
The 4TeX main menu is a complete workbench for TeX and all its friends,
however, during the edit-compile-view/print cycle you do not need all
the options/possibilities. Also the 4TeX windows can be large and
therefor unhandy, especially if you have many windows open. As an
alternative to the 4TeX main menu, 4TeX offers several speedbars:
- Speedbar with "text" buttons, e.g. fits on top of the screen

- Speedbar with "images" buttons (smaller than the "text" buttons)

A speedbar has the same buttons as shown in the
Main menu. There are two additional buttons:
First there is a "Main file" button, that can be used to select the
main TeX file. The second extra button is the "Menu" button and this
button will close the speedbar and reopen the 4TeX "Main menu". When
left clicking on the 4TeX icon of the speedbar you will invoke the 4TeX
help/about popup menu to show the 4TeX help file or the 4TeX about box.
If you have a "user position" speedbar (see below), you can move the
speedbar by right-clicking on the 4TeX icon. After clicking the default
mouse cursor will change into a hand and you can move the speedbar to
any position on the screen. By right-clicking once more the
current position is stored as the position of the "user position"
speedbar. By right-clicking on the "Print" button the
options menu will appear. By
right-clicking on the "Main file" the history of the last 10 TeX files
is shown. By right-clicking on the "Log file" button the console output
window will be shown.
Now we will explain the screen options in more detail:
The first field in the "screen options" page allows you to
select the language that is used for all the 4TeX screens. Select the
language you want and after pressing the "Apply" button all the windows
are updated (so the language of the screens needn't be set in the
initialization of 4TeX but can be changed during runtime).
When checking the "Stay on top" checkbox, the 4TeX main
window will always being displayed on top of all other
windows, i.e. this means that the 4TeX menu is always
completely visible.
With the next two radio buttons you can either choose to display the
"Main" 4TeX menu (i.e., the menu you are currently using) or select a
speedbar. When selecting the speedbar you can choose the screen location
of the speedbar and specify whether you want the "text" button speedbar
or the "images" speedbar. Locations on the screen can be any screen
corner and can be either a horizontal or a vertical bar. You can also
choose a "user position" speedbar and place it any where on the screen.

After having made the selections of the screen options
you want, you have to press the "Apply" button to update
4TeX and invoke the options.


